We have figured out what NgTemplateOutlet does in my previous article. NgTemplateOutlet is a way of telling Angular to render a template (bunch of html elements) in #templateVariable, which enables us to pass data as a context or even passing elements to a child component from a parent component.
In this article, I am going to show you how NgTemplateOutlet can tidy up your code by improving readability and how we can inject a template through NgTemplateOutlet displaying dynamic templates. You can access full code from [StackBlitz]
Use Case
Description: I want to create a blog showing different styles based on multiple media; Medium, LinkedIn and Scoop, all of which have their own way to show their articles. I am going to create Medium platform with typical <div> and <a> link set, LinkedIn with <card> and Scoop with <listGroup>. The below images are what we are trying to achieve.


How would you structure html? Most people might write code with multiple if statements and add a bunch of html elements inside each if statement just like below.
Problem
The html file has around 100 lines and would be increased when we have more requirements. It might be unnecessary to set maximum length of lines to each html file using eslint as it can be different based on requirements, but you guys all know that the shorter the line, it’s easier to read and maintain. If the code is hard to read, it’s not easy to maintain and cost more money later in a maintenance phase. If you want to change the Medium code, you have to touch the existing code, which violates Open for Extension and Close for Modification principle; Let alone single responsibility and separation of concerns.
Solution
What we are looking for is clean code. We will refactor the lengthy code later by separating each platform to each component and provide those templates from each component (parent) to a child component. At the moment, let’s think about how we can improve it with NgTemplateOutlet.
Step 1 : Separate concerns in each template variable using NgTemplateOutlet
A template variable is a local reference. You use it by putting #variableName in html template just like below.
<div #myTemplateVariable></div>You see that the code is much cleaner as you don’t need to get your eye balls around to find each platform code. You just go down and see which template variable is referring to each platform.
Be mindful of the code below. The reason I put NgTemplateOutlet different ways is to arouse your curiosity. I will deal with this in detail in my next article. Basically you can’t use Structural Directive (*ngIf, *ngFor, etc) to the same element and the code below shows how we could avoid that.
Step2: create each component for each platform and inject template through Input decorator.
First, I am going to create a parent component showing common elements such as three buttons.
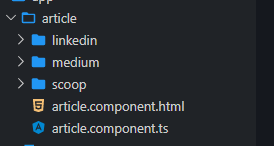
As you see, now the platform component only cares about what platform you are choosing on. Then I will create a folder called article and three components; medium, LinkedIn, and scoop, each of which has their own logic and template. The article component is a placeholder or presentational component for those components.
Let’s look at the ArticleComponent.ts which is the placeholder for those article templates.
See contents and template. Input is something we are getting from a parent component. As you might have already expected that from the type, template is a html template I am getting from a parent component as a property binding. How are we passing data using a property binding? with square brackets.
<ng-template #scoopTemplate let-items="contents">...</ng-template><app-article [contents]="contents" [template]="scoopTemplate"></app-article>
This is how ArticleComponent.html template looks like.
To understand what we are passing from a parent component (ScoopComponent). Let’s see the whole ScoopComponent code.
Now, let’s try to understand how the component communicates from PlatformComponent to ArticleComponent.
In PlatformComponent, we have three buttons. Based on what button you click, we show one of the article components. I clicked Scoop button from UI. Then, it goes to ScoopComponent having that selector <app-scoop>.
<app-scoop *ngIf="selectedType === mediaType.scoop"></app-scoop>In ScoopComponent, it generates ArticleComponent passing #scoopTemplate and contents to the AriticleComponent using a property binding.
<ng-template #scoopTemplate let-items="contents">
...</ng-template><app-article [contents]="contents" [template]="scoopTemplate"></app-article>
In ArticleComponent, it gets contents and #scoopTemplate through Input() decorators as below.
@Input() contents: { title: string; description: string; img: string }[];@Input('template') templateRef: TemplateRef<any>;
Now, now we encounter ngTemplateOutlet and its intention is generate template having templateRef. What’s templateRef? it’s #scoopTemplate. So it generates #scoopTemplate in ScoopComponent.html
<ng-container *ngIf="contents?.length"> <ng-container [ngTemplateOutlet]="templateRef"> </ng-container></ng-container>
The flow looks like this.
PlatformComponent <app-scoop>
👉[ngTemplateOutlet]=”templateRef
👉 [template]=”scoopTemplate”
👉#scoopTemplate
Summary
NgTemplateOutlet is very useful to tidy up code and you can also inject template using property binding thus achieving single responsibility, separation of concern and open for extension and closed for modification. Now time for you actually use it in your code 😀.

![[TypeScript/Angular] const variable name uppercase or lowercase?](https://miro.medium.com/v2/resize:fit:679/1*yuVzMhCJyDENbyhwAsrkwA.png)
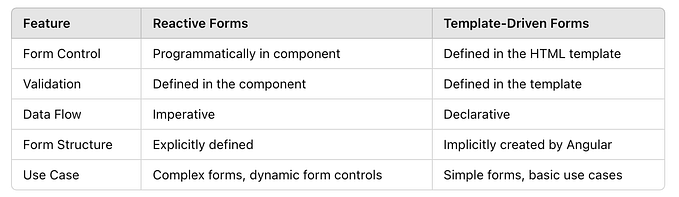
![[Angular] How to create a dynamic & reusable form](https://miro.medium.com/v2/resize:fit:679/1*Jb48denYTOH3RP5OD5meAw.png)
![[Angular / TypeScript] Constructor Assignment in various ways](https://miro.medium.com/v2/resize:fit:679/1*sDUxRx6z8rJjotFtLwWiWw.png)
![[Angular] What is NgTemplateOutlet for beginners](https://miro.medium.com/v2/resize:fit:679/1*WDdY9f2BKLiMoXxxY72IGQ.jpeg)